The countdown begins…

Standard

6 days until October begins.

6 days until I can celebrate Halloween without feeling embarrassed.

6 days until I start another 31 days of Halloween!!!


Woo! No idea how often I’ll update the blog, but you heard it here first! (Well, second, if you follow me on Instagram.) For the second year in a row, I’ll be celebrating my fanatical adoration of Halloween and fall festivities by filling each day in October with a craft, recipe, or movie that is Halloweeny or generally spooky/creepy/scary/etc. Most of these things were found through Pinterest, so I’ll always link to the originals so you can try them out for yourself!

Some fun things to look forward to:

  • Candy Corn Cupcakes
  • Jalapeno Popper Mummies
  • “Happy Halloween” Banner
  • Trick-or-Treat Cookies
  • DIY Halloween Wreath

So stay tuned! Also check out my YouTube channel in case I decide to post video updates there. I’ll also be posting photos on my Instagram.

See you in 6 dayssss!!!!

CARVING PUMPKINS!

Standard

Howdy folks! I hope you’re having a lovely November so far, and that you aren’t missing Halloween too much (though goodness knows I am).

I thought today I’d show off some pictures of the jack-o-lanterns that Dillon and I made this year! I feel like I must’ve carved pumpkins when I was younger, but I don’t have many memories of it, and definitely don’t have a lot of experience as an adult doing it. So it was fun to finally try it out!

We started with two cute pumpkins from Trader Joe’s. The ones at other stores were either too large or way too small, but these were a good size.

IMG_4573

Scooping all the “guts” out took longer than I expected, but it was worth it (and we ended up baking the pumpkin seeds later… they were delicious!).

IMG_4574

I was making a jack-o-lantern with a Jack Skellington face (from Nightmare Before Christmas). I sketched a rough outline of one of his more evil looking faces and began carving.

IMG_4575

We were using both kitchen knives and a small, cheap “power saw” that I bought at Walgreens for like $6 that ran on four AA batteries. It jammed easily and often, but was definitely a nice tool to have on hand when our knives were a little too large to sink into the outside of the pumpkin.

IMG_4576

I also bought us some little LED candle lights (since our apartment wouldn’t be too happy with us using actual candles). The end results were super cute! Pictured below is my Jack Skellington, along with Dillon’s: the character Tim from video game “Braid.”

IMG_4585

Glowing Eyes Craft!

Standard

I was inspired to do this decoration by this blog, and had already been collecting empty paper towel rolls for some other crafts, so I had most of the supplies already.

I started with some 99 cent glow sticks from CVS and a few paper towel rolls. You could use toilet paper rolls too, but I wasn’t sure if my glow sticks were short enough that they wouldn’t be sticking out of the ends.

IMG_4624

I sketched some eye patterns similar to the ones on the blog post and then roughly cut them out. This was actually harder than you’d think, unless you have really sharp scissors. I alternated back and forth between dull scissors and a box cutter and it wasn’t exactly a walk in the park.

IMG_4625 IMG_4626

With the glow sticks placed inside, they looked really neat! This is definitely something you can try with different colored glow sticks as well, although the monochrome green looks pretty cool too.

IMG_4627

Needless to say my Halloween spirit doesn’t end after October 31st. I can’t wait to show you a couple more things I have yet to do on my list!

IMG_4629

HAPPY HALLOWEEN!

Standard

Happy Halloween, friends! It has been a gloriously rainy day here in the East Bay and I’m ecstatic that we had some gloomy weather on this spooky day. Plus, our plants were thirsty in this drought!

I haven’t been updating this blog as much as I would like, but I can assure you I’ve been filling my time with candy-eating, horror-movie-watching… I’ve painted my toenails into jack-o-lanterns, and I’ve been listening to the Nightmare Before Christmas soundtrack. I’ve been doing plenty of Halloween-y things and I don’t plan on stopping even though tomorrow is November!

So yes, I will continue posting some blogs here about the things I’ve done and the things to come. Until then, here’s a post about my costume!

This year I decided (many months ago) to be a Weeping Angel from Doctor Who. I’ll try not to spoil too much, but… the premise of the Weeping Angels is that they are angel-like statues that cover their faces and can’t move… unless no one is looking at them. Then they attack!

I bought a mask on Amazon for about $15 and it came in a funny bronze color, so I decided to go over the entire thing with metallic silver sharpie so that it would better match my silver fabric.

IMG_4277 IMG_4522

I bought this really cool fabric that (to me) looked kind of like a grey marble or something.

I found a YouTube video that helped me figure out how to make patterns of a simple shirt and a circle skirt using my own measurements. I did hand sewing for everything, which took a while, and wasn’t the neatest, but I think it came out fine regardless.

IMG_4538 IMG_4536 IMG_4537 IMG_4547 IMG_4545 IMG_4544

I had to go to work in the morning, and I didn’t want to wear my mask, so I got a metallic silver eyeliner and used it on my eyes, face, and lips.

DSC_0003 DSC_0005

I don’t think anyone got the Weeping Angel thing, especially without the mask, and I’m not sure anyone would’ve guessed statue, either. But I’m still proud of the finished product!

DSC_1193 DSC_1206

I hope everyone has/had a wonderful Halloween. Go eat some candy! 😉

DAYS 16, 17, & 18!

Standard

Slowly but surely making my way through October.

In today’s post, I’ve got three crafts for you, including one I’ve been working on as part of my Halloween costume!

The first was inspired by this post, and reminded me greatly of a decoration my parents used to have for their house. I bought some simple styrofoam spheres from a crafts store, some small “eye” screws from a hardware store, and ended up getting white mesh instead of cheesecloth. That last part wasn’t the greatest idea, but I made it work.

IMG_4497

After drawing some sets of eyes on the styrofoam balls, it was as simple as layering the mesh on top, screwing in the “eye” screw, and cutting and tearing the bottom of the mesh until it looked rough and messy.

IMG_4498

As you can see, the mesh was much firmer than expected (and also much more transparent than the cheesecloth would have been) so I tied the layers with some white thread.

IMG_4499

It ended up looking pretty cute, I think. But I’m definitely going for the cheesecloth next time.

The second craft came from this blog, and was really fun to do. I got some orange flannel fabric and got to work.

IMG_4510

It was pretty easy to eyeball the measurements and adjust accordingly. And I had leftover black fabric from last year’s Halloween costume so I made the face from that.

IMG_4520

Super cute! And I have enough fabric to do this for at least one more of our couch pillows, and possibly two. I love this because it’s themed and festive but still totally practical and usable. (The flannel material is so soft and comfy!)

Last but not least, I’ve been working on my Halloween costume, one step at a time. I bought a mask from Amazon that’s the perfect style and size, but the color was a little off. So I’ve been coloring it in with a metallic silver sharpie to give it a more shiny silver look to match the fabric I bought to make the dress out of. The next step is to go in with a pencil or another darker silver/grey color and fill in the shading it originally had.

IMG_4277IMG_4522

The rest of this weekend will be spent (hopefully) working on the dress part of my costume, as well as making a couple more recipes on my list.

DAYS 14 & 15!

Standard

One craft and one recipe for you today! Finally changing things up a bit.

So I finally finished the table runner I started making a week or so ago. It wasn’t complicated, but there was a lot of tedious cutting involved. Because I like to reuse/recycle materials, I used some scrap fabric for this one so it isn’t exactly perfect around the edges. But regardless, I still think it looks pretty cool.

photo 1

photo 4

IMG_4488

As for the recipe, I decided on this candy corn Halloween bark (even though I don’t really like candy corn and technically shouldn’t be eating it because it contains gelatin). I had never made bark before, but the website made it seem that all that was involved was throwing a bunch of yummy stuff together and binding it all with candy melts or melted chocolate.

IMG_4489

I used some white chocolate M&Ms (that were white, orange, and yellow) and left out the sprinkles because I couldn’t find any at the nearest grocery stores.

IMG_4493

I ran out of the white candy melts, but had some orange left over from a different recipe, so I used that as well.

IMG_4494

The end result was pretty tasty (but EXTREMELY sweet). But it looked pretty cool! I don’t think I messed anything up too badly. 🙂 I did learn, however, that next time I need to make sure the candy melts really melt into the candies so that it all binds together super well.

IMG_4496 IMG_4495

Bonus picture of candy corn in candy corn:

IMG_4490

DAYS 12 & 13!

Standard

Another two simple crafts are covered in today’s post, found from here and here, respectively. Dillon mentioned to me that our apartment is getting a little more decked out in Halloween decorations each day. I think he likes them, but I also think I need to start watching some movies and making some recipes because otherwise our whole place will soon be swallowed up by spiderwebs and skeletons.

The first one is a take on connected paper dolls. I wasn’t sure I’d have any paper long enough, but then I realized I still had an old page from my wall calendar lying around as scrap paper!

IMG_4476

So I cut and folded the paper into the right size, and then traced a spider drawing from the template found on the page mentioned above.

IMG_4477

The next step is easy! Just cut through all the layers after you’ve folded it like an accordion.

IMG_4478

I did this another time with a skull and crossbone design because it’s so stinkin’ easy to do.

IMG_4479

The second project is another easy one, but I felt bad having to use new materials. When I can, I reuse old scrap paper, fabrics, etc. But I couldn’t exactly use an old, already used garbage bag for this one… so. You gotta pick your battles.

IMG_4483

Cut a square, fold the bag, draw a design, and cut!

IMG_4485IMG_4487

Cuuuuuuuute.

The bark recipe will be made tomorrow, so the blog post about it will come late tomorrow night or Tuesday! Also, I’ll be posting another weekly recap vlog on my YouTube channel on Tuesday, so check that out!

DAYS 10 & 11!

Standard

To add to my growing list of Halloween related papercraft decorations, the next two days will be filled with these simple projects. The first was inspired by this post, and the second was taken from here.

The clipart shapes that I used were the same from the original blog I found the idea in, but it would be pretty easy to sketch up different ones. These tend to be more cute-Halloween than spooky-Halloween, which is fun.

IMG_4447

Instead of cutting out the features, I used a metallic silver sharpie to make things a little easier.

IMG_4448

After that it was as simple as taping them onto pieces of thread in alternating patterns, and hanging them up somewhere cool! The taped thread was a little more obvious than I would have liked, but it was an easy solution so I stuck with it.

IMG_4463IMG_4464

The next project already had templates made, but I sketched my own to save time and printer ink. Again, it was as simple as cut and tape! And now our apartment is filled with spooky little mice 😀

IMG_4470

IMG_4472

IMG_4471

Tomorrow’s blog post should be on a few more easy crafts that you can use to decorate your home for the holiday. After that, I’m doing a great recipe for Halloween bark that I’m super excited to try!

Thanks for tuning in! ❤

DAYS 8 & 9!

Standard

In my attempt to still have done at least one thing per day in October, I’m going to categorize these blog posts into days, even though that isn’t exactly how they ended up. So this post will contain two different crafts I’ve completed, representing days 8 and 9. 🙂

The first might be my favorite so far. It required some supplies that were slightly harder to find, but I think it was worth it in the end. And it wasn’t necessary to have any fancy skills… just some patience to work on it.

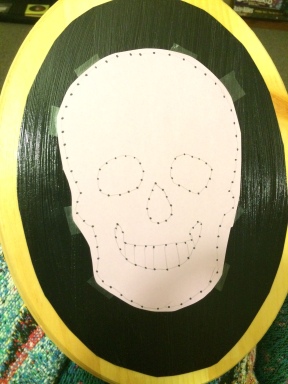
My first step in the process was cutting a rounded shape out of black cardstock and affixing it to this wooden piece using mod podge, and then letting it dry overnight.

IMG_4363

Look at that! Already lookin’ pretty neat.

Then I sketched a skull shape based on the one used here, and taped that onto the wooden mount. I also drew some dots around the outline of the skull, the eyes, the nose, and the mouth, but ended up not following them as they were a little too close together for my liking.

IMG_4364

The next step took a while because I like doing crafty things at night but can’t when that crafty thing involves a loud thing. Hammering nails into a piece of wood wasn’t exactly an 11pm activity.

IMG_4385

Sweet! Looks cool. At this point I tore up the paper sketch, and began wrapping thin white thread around the nails. I first outlined each part (whole skull, each eye, nose, mouth) and then wrapped zig-zagging lines between each part without going inside of the eyes, nose, or mouth. This part was a bit tedious but it was just brainless enough that I could throw on a rerun (or two) of The Walking Dead and just work on it for a couple hours.

IMG_4441IMG_4442

It’s not the most perfect skull string art anyone’s ever made, but I’m still really proud of it. It took dedication to spend several hours on it and it ended up looking pretty neat! It’s a great Halloween decoration addition to our bookshelf.

IMG_4439

Day 9’s craft was a SUPER easy papercraft. It was as simple as tracing out a certain shape, cutting it out of black cardstock, and taping it onto a toilet!

IMG_4443

IMG_4446

Spoooooky! Or, kinda cute.

I’m more than halfway done with at least two more projects, so hopefully I’ll have a few more to blog about tomorrow!

DAY 7 – BAT MOBILE

Standard

The first time I told Dillon I was doing a “Bat Mobile,” he got really excited, expecting me to replicate a sleek car. Unfortunately, I’m not doing that kind of bat mobile…

Using this website as a guide, I sketched out a shape for half of a bat, and then traced it again a few times.

photo 1

After cutting them all out, I bent them in the center (where there was already a fold) and then again to create the wings.

photo 3 photo 2

After that it was as simple as choosing a method of hanging (I chose thin black thread and scotch tape) as well as choosing a location.

photo 1photo 5 photo 4

Really easy, right? And yet it happens to be one of my favorite things on the list so far.

Speaking of which, tomorrow’s craft is SUPER awesome and I’m EXTRA excited for it which means there’s a TON of pressure for it to come out okay. I already prepared one of the steps tonight (so that it could dry). I can’t wait to show you guys the end result!

And before I bid you goodnight, here’s a bonus picture of my final product bat mobile above some Walking Dead reruns.

photo 2